
After a break-in, most people are not thinking about paperwork first. They are thinking about whether everyone is safe, what was taken, how the intruder got in, and how quickly life can feel unsettled afterward.
Then the insurance process starts, and a new concern shows up fast: documentation. You may be asked for a police report, a list of stolen items, proof that you owned them, and details about when and where they were purchased. That can feel overwhelming, especially if receipts are missing.
The good news is that you do not need perfect records to start building a strong claim file. In many cases, there are practical ways to document theft claim insurance companies can review, even if your proof is incomplete at first. The key is to be organized, specific, and timely.
What Happens After a Theft Claim Is Filed
Once a theft is reported, the process usually moves through a few basic stages. First, the break-in is reported to law enforcement. Then the insurance company is notified. After that, the focus shifts to documenting what happened and what was lost.
This is where many homeowners and renters start to worry. They know what is missing, but they are not sure how to prove it. A missing laptop, necklace, bicycle, or set of tools may feel obvious to the person who owned it. But an insurer will usually need more than a general statement that “some stuff was stolen.”
That does not mean the claim process is designed to be hostile. It means theft claims typically depend on details. The insurer may need enough information to understand:
- what was taken
- whether it appears to be covered property
- what the items were worth
- whether there is supporting proof of ownership or prior possession
This is why documentation matters so much. It helps move the claim from a stressful event to a clearer record of loss.
It also helps to remember that theft claims are often built piece by piece. You may not have every detail on day one. What matters is starting promptly, preserving what you do know, and organizing it in a way that makes the claim easier to review.
The Theft Claim Documentation Checklist
If you are trying to figure out what to gather, start with a simple checklist. Most theft claims involve some version of the following:
- Police report number or report details
- Date and approximate time of the break-in or discovery
- Photos of damage or points of entry
- A list of stolen items
- Details for each item, such as brand, model, size, color, or identifying features
- Approximate purchase date
- Estimated value or original purchase price
- Any proof of ownership you can find
- Photos or videos showing the items before the theft
- Bank or credit card records tied to purchases
- Warranty registrations, serial numbers, manuals, or original packaging if available
You do not need to panic if some of those items are missing. This is not an all-or-nothing exercise. The purpose of the checklist is to help you build a fuller picture of the loss.
It also helps to think in categories. Go room by room and ask:
- What is definitely missing?
- What may be missing but still needs to be confirmed?
- What evidence do I have for each item?
That approach is especially helpful after a break-in because people often remember the obvious items first, such as a television or laptop, and only later realize smaller things were taken too, like a watch, headphones, gaming accessories, tools, handbags, or cash stored in a drawer.
A good checklist slows the process down just enough to reduce those omissions.
Step 1: Start With the Police Report
The police report is one of the first anchor points in a theft claim. It creates an official record that a break-in or burglary was reported and helps establish the basic facts around the event.
What information the report typically includes
While formats vary, a police report often includes the date of the report, the location, a description of the incident, signs of forced entry if present, and a preliminary list of reported stolen items or damage. It may also include the names of the reporting parties and a case or incident number.
That report may not include every missing item in perfect detail, especially if you were still discovering losses when the officer arrived. That is normal. The important thing is that the incident is reported accurately and promptly, and that you keep the report number and any related paperwork.
Why insurers often request the report number
Insurers often ask for the report number because it helps connect the insurance claim to a reported theft event. It also gives the claim file a clear reference point for timing and circumstances.
If you have not received the full written report yet, keep whatever information you do have:
- report number
- officer name if available
- department name
- date the report was filed
That way, you can still begin organizing the rest of your documentation while waiting for the full paperwork.
It is also wise to keep your own notes right away. Write down when you discovered the break-in, what you saw first, which doors or windows were affected, and what items you noticed missing in the first pass. Memory tends to change under stress. A same-day note can be surprisingly helpful later.
Step 2: Create a Detailed List of Stolen Items
The stolen item list is one of the most important parts of the claim. This is where many people unintentionally make the process harder by being too vague.
“Jewelry stolen” is not as helpful as “yellow gold chain bracelet, gift received დაახლოებით 2021, worn regularly, stored in top dresser drawer.”
“TV missing” is less useful than “55-inch Samsung smart TV, black, wall-mounted in living room, purchased დაახლოებით summer 2023.”
The more specific your list is, the easier it may be for the claim to be reviewed.
For each item, try to include:
- item type
- brand
- model if known
- size, color, material, or distinguishing features
- serial number if available
- approximate purchase date
- approximate purchase price or current estimated value
- where the item was kept in the home
This is especially important for electronics, bicycles, musical instruments, power tools, appliances, and jewelry. These items often benefit from descriptive details that show they were real, identifiable possessions rather than broad estimates.
If you do not know exact dates or prices, use your best good-faith estimate. “Around late 2022” is better than leaving the date blank. “Purchased for about $700” is better than offering no number at all. The point is not perfection. The point is usable specificity.
A room-by-room method often works best:
- bedroom: jewelry, shoes, watches, laptops, handbags
- living room: TV, speakers, gaming consoles
- kitchen: smaller electronics or specialty appliances
- garage or storage: tools, bikes, sports equipment
- home office: computer equipment, monitors, accessories
This method helps uncover smaller missing items that are easy to forget when you focus only on high-value losses.
Step 3: Ways to Prove Ownership (Even Without Receipts)
This is the step that causes the most anxiety. People think, “I do not have the receipt, so how can I prove this was mine?”
Receipts are helpful, but they are not the only possible form of documentation. Other records may help show that you owned the item or had it in the home before the theft.
Start with the most direct alternatives.
Product photos can help, especially if they show the actual item in your home. A photo of your bicycle on the patio, your TV in the living room during a holiday gathering, or your laptop visible on a desk in an older photo can all help support ownership.
Packaging, manuals, and warranty papers can also be useful. Many people keep these longer than they realize, especially for electronics, appliances, and tools. Even a product box stored in a closet can help identify brand and model.
Bank and credit card statements can help show that you bought an item, even if the original receipt is gone. A charge from an electronics store, jeweler, sporting goods shop, or online retailer may not prove every detail by itself, but it can help support the timeline and purchase amount.
Warranty registrations or order confirmations can also be valuable. Many purchases leave a digital trail:
- email confirmations
- shipping notices
- store account histories
- online order records
- financing records for larger items
Old photos and videos are especially underrated. Family photos, birthday pictures, move-in videos, or casual clips taken at home may show the item in the background. That may sound minor, but it can help establish prior possession.
For example:
- a photo taken in your apartment shows the stolen gaming console under the TV
- a holiday picture shows the necklace you reported missing
- a garage photo shows the brand and color of the stolen bicycle
- a work-from-home photo shows the monitor, desk chair, and printer that were taken
If you are trying to prove ownership without receipts insurance records may still accept or consider other supporting documents. The stronger approach is to combine multiple small pieces of proof rather than rely on one perfect item you may not have.
For higher-value items, it can also help to gather anything showing uniqueness:
- serial numbers
- engravings
- app registrations
- service records
- repair records
You do not need every piece for every item. But the more complete the pattern, the better.
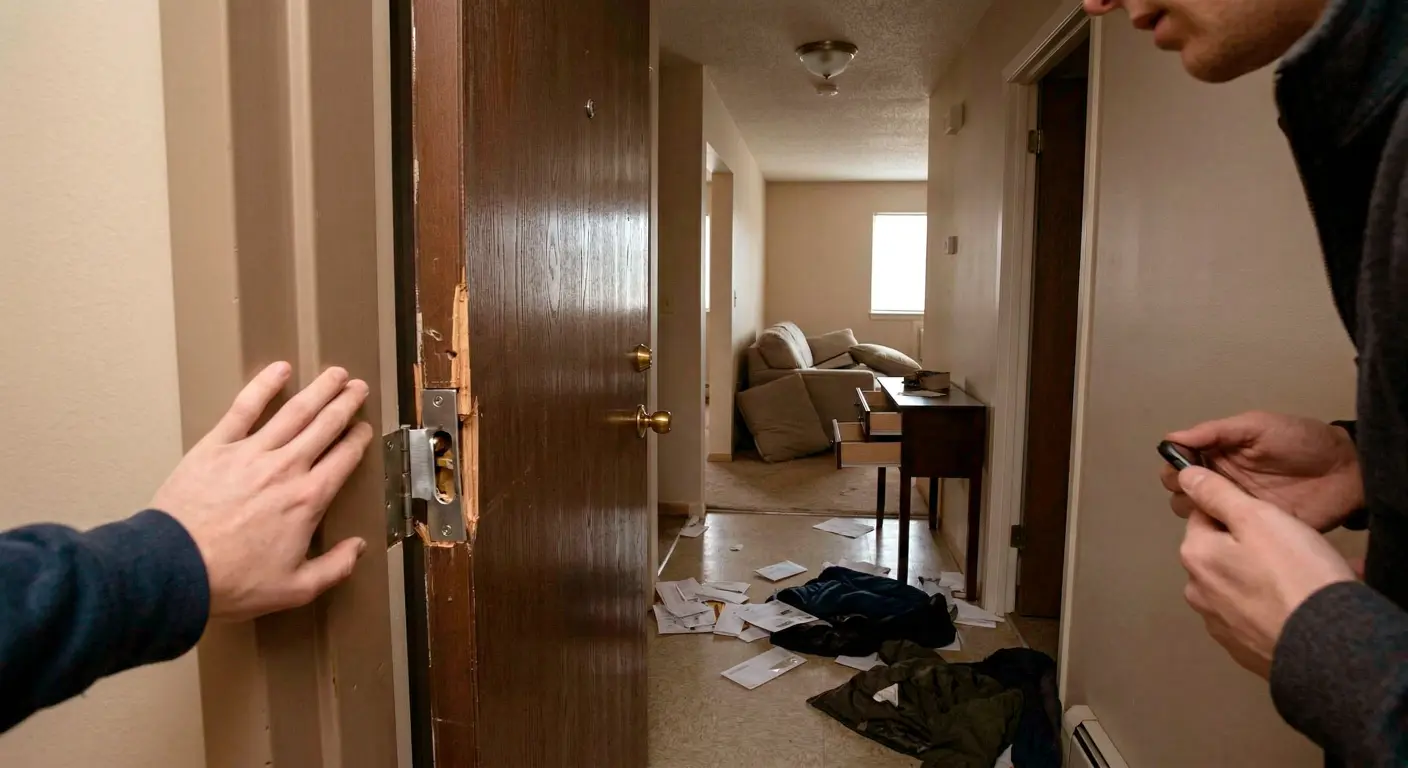
Step 4: Document the Scene of the Break-In
The claim is not only about what was stolen. It is also about the event itself.
That is why documenting the scene matters. Photos of the point of entry, damaged locks, broken windows, splintered door frames, or disturbed rooms can help support the overall loss narrative.
Take clear photos of:
- damaged doors
- broken locks
- shattered windows
- pry marks
- damaged cabinets, drawers, or safes
- rooms that were clearly searched or turned over
Wider shots can help show the general scene. Closer shots can help show damage details. If something appears out of place, photograph it before cleanup if possible, as long as doing so is safe and appropriate.
This part of the file may matter for more than one reason. It can support the timeline of the event, help explain how the theft occurred, and reinforce that the home was entered or disturbed in a real and observable way.
If property damage is part of the loss, keep records related to that too. Even if the claim is focused mainly on stolen items, the condition of the home can still be relevant.
The goal is not dramatic storytelling. The goal is simple documentation.
Common Mistakes People Make When Documenting Theft Claims
One common mistake is being too general. Saying “a lot of jewelry” or “several tools” leaves too much open to interpretation. It is better to break items down one by one whenever possible.
Another mistake is forgetting smaller items. After a break-in, people naturally focus on the biggest losses first. Later they realize smaller but meaningful items are gone too: chargers, earbuds, sunglasses, handbags, kitchen appliances, collectible items, power tool batteries, or specialty clothing.
A third mistake is estimating value without any context. A number by itself is weaker than a number tied to something practical, like the store where it was bought, the year it was purchased, the model, or what similar items cost at the time.
Delaying documentation is another issue. The longer you wait, the harder it may be to remember where items were kept, when they were bought, and what else may be missing. Even if you cannot complete the whole file immediately, it helps to begin early and add to it in an organized way.
Some people also assume that if they do not have receipts, there is no point in listing an item. That can lead to losses being omitted entirely. A better approach is to document the item with whatever support you do have and present it clearly.
Another avoidable mistake is failing to organize digital proof. Screenshots, account histories, old emails, and photo gallery images are useful only if you can find them when needed. Creating one folder for the claim can make a big difference.
How to Prepare for Theft Claims Before They Ever Happen
No one wants to prepare for a burglary. But a little preparation can make a future claim much easier to document.
The most useful step is maintaining a home inventory. That does not need to be a formal spreadsheet with every spoon and towel in the house. It can be as simple as a room-by-room list of major belongings, especially higher-value items.
Photos help a lot. Taking a few minutes every so often to photograph rooms, closets, electronics, jewelry, bicycles, musical instruments, tools, or collectibles can create a record that is much easier to use later than memory alone.
Video walkthroughs can help too. A simple phone video of each room, narrated casually, may capture more than you realize:
- the TV model in the living room
- the laptop and monitor in the office
- the jewelry box on the dresser
- the tools in the garage
- the bike stored on the patio
Saving purchase confirmations is also worth the effort. Many people already have them in email but never organize them. Creating a folder for larger purchases can make future documentation easier.
If you own items with serial numbers, it can help to record them when practical. This is especially useful for electronics, bicycles, cameras, and tools.
Maintaining a home inventory may make claims easier to document because it shifts the work from stressed recall after a theft to calm organization beforehand.
If you are filing a theft claim—or want to be better prepared for the future—it may be helpful to review how your homeowners or renters policy handles personal property coverage. The team at Miles Jackson Insurance can walk through your coverage and answer questions about documenting belongings. A quick conversation can help you understand how your policy works before the next unexpected situation.
When to Ask an Insurance Agent for Help
A lot of people think they should only contact an agent when buying or changing a policy. But after a theft, an agent can also be helpful when the documentation process feels unclear.
You may want help if:
- you are not sure what counts as useful proof
- you are missing receipts for many items
- you do not understand how personal property coverage applies
- you are unsure how detailed the stolen item list should be
- you want to review your policy after the immediate situation settles
An agent may not replace the insurer’s claim handling process, but they can often help you think more clearly about what to gather and how to understand your coverage. Sometimes that alone reduces a lot of stress.
For homeowners and renters in Georgia or Alabama, that kind of guidance can be especially useful when the event has already disrupted daily life. At that point, people usually do not want abstract insurance talk. They want a calm explanation of what matters next.
After a break-in, the goal is not to create a perfect file on day one. It is to create a credible, organized record of the loss. The clearer and more specific that record is, the easier it may be to move the process forward.
What documentation for theft insurance claim is usually needed?
A theft claim usually involves a police report, a list of stolen items, supporting proof of ownership, approximate purchase dates, and estimated values. Photos of damage from the break-in may also help support the claim. Exact requirements can vary, but detailed documentation is typically important.
What belongs on a renters insurance theft claim checklist?
A renters insurance theft claim checklist should usually include the police report number, itemized list of stolen property, photos of damage or forced entry, purchase records if available, and any photos or videos showing the missing items before the theft. Room-by-room review can help make the list more complete.
What homeowners theft claim proof is often helpful?
Helpful proof can include receipts, bank or credit card statements, product photos, packaging, manuals, warranty registrations, serial numbers, and older home photos or videos showing the items in place. The strongest claim files often use multiple forms of support rather than relying on a single document.
How do I list stolen items for claim review?
List each item separately with as much detail as you can: brand, model, size, color, approximate purchase date, estimated value, and where it was kept in the home. Avoid broad descriptions like “electronics” or “jewelry.” Specific entries are usually easier to review than grouped estimates.
How can I prove ownership without receipts insurance companies usually request?
If receipts are missing, other documents may still help demonstrate ownership. These can include photos of the item in your home, bank statements, email confirmations, warranty records, packaging, serial numbers, repair records, or videos where the item is visible in the background.
Should I document break-in damage even if the main loss is stolen property?
Yes, it is usually helpful to photograph the scene, including broken windows, damaged doors, forced locks, or disturbed rooms. That kind of documentation can help support the overall claim and show how the theft occurred.
If you are filing a theft claim—or want to be better prepared for the future—it may be helpful to review how your homeowners or renters policy handles personal property coverage. The team at Miles Jackson Insurance can walk through your coverage and answer questions about documenting belongings. A quick conversation can help you understand how your policy works before the next unexpected situation.
RELATED LINKS:
National Association of Insurance Commissioners (NAIC) – Filing an Insurance Claim